
-----------------------------------
Now onto the art...
I started with a piece of watercolor paper and created my background by adding layers of acrylic paint, acrylic glazes, and gesso. The layers were added in no particular order and continued until I felt that the painted background was complete. Today it took 9 layers and you can see the step-by-step process below.


Done. I was happy with how the piece looked so far and decided it was time for stamps. I started with Sketched Background and a black ink pad.

This is the perfect stamp for me as I knew I could use it to add both random marks on the surface as well as more deliberate marks around the edge of the piece. I always feel that "framing out" an artwork makes it look more complete. For that reason I also rubbed a black stamp pad around the edges of the paper as well.
This is the perfect stamp for me as I knew I could use it to add both random marks on the surface as well as more deliberate marks around the edge of the piece. I always feel that "framing out" an artwork makes it look more complete. For that reason I also rubbed a black stamp pad around the edges of the paper as well.

It is hard to see the stamping online with such a dark background but you can see it more clearly in this close-up detail.

I moved on to Pam's Columns of Dots stamp.

I love the grungy and random way the dots were created. This time I stamped using both a black ink pad and a metallic gold ink pad.
I love the grungy and random way the dots were created. This time I stamped using both a black ink pad and a metallic gold ink pad.

You can see in this close up detail that I also used a white gel pen to randomly add curved marks around some of the stamped circles.

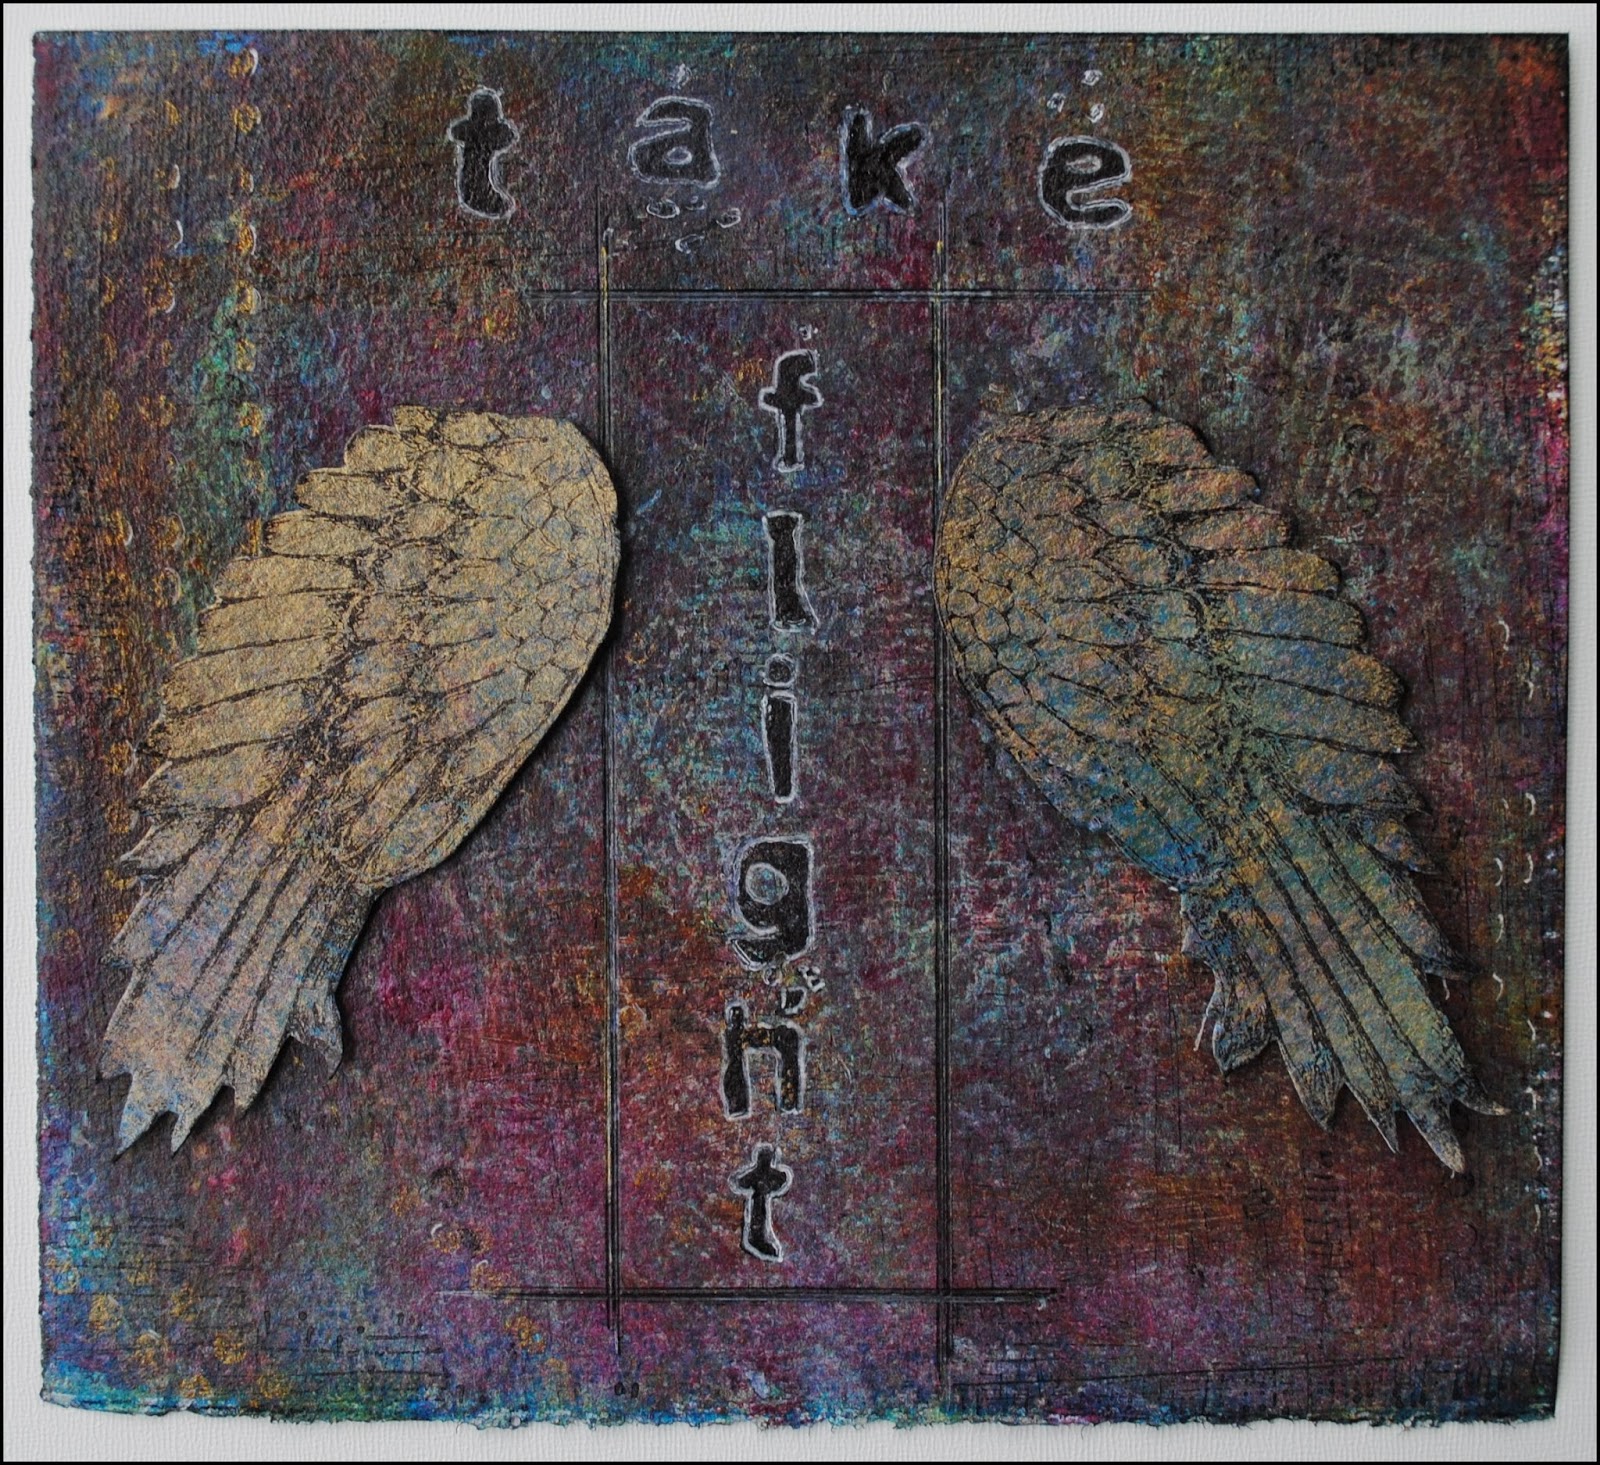
I went into my stash of alphabet stamps and found a set that had the perfect font and size for this piece. I used a black ink pad to stamp the words "take flight" and outlined the letters with a white gel pen to make them stand out from the dark background. I also drew a scratchy rectangle around the word "flight" using black, white and gold pens.

For my next step, I painted another piece of watercolor paper using the same process I described above. I used a bit of a different color palette and added metallic gold acrylic paint as my top layer.

I saved the best for last: Pam's I Will Soar wing stamps.

I stamped them onto the painted paper using a black ink pad. Once stamped, I cut out the wings using the edges of the stamped wings as a guide. I actually often think of wings as being one of those images that has been a bit overused in mixed media art. But I couldn't resist using Pam's wings. There is something very special about their design!
I stamped them onto the painted paper using a black ink pad. Once stamped, I cut out the wings using the edges of the stamped wings as a guide. I actually often think of wings as being one of those images that has been a bit overused in mixed media art. But I couldn't resist using Pam's wings. There is something very special about their design!

I added the wings to the piece, inserting small squares of book board between the substrate and the wings so that the wings were lifted off the piece, adding dimension and echoing the title of the artwork "Taking Flight."
Thanks Pam. These stamps are going to get a lot of use!


38 comments:
As usual all the detail and layers is enlightening and inspiring. I particularly like the depth and then the white outlining. Thanks, Seth.
Love how you added the wings to this piece, giving it dimension.
Nicely done. I enjoyed seeing your process.
Way cool! Makes me want to put my apps down and go old school again! Well done Mr. Seth ...well done indeed!!
Absolutely love how you used my stamps, making them 'your own' with the art you created! Thanks friend for joining in the blog hop:-)
Such wonderful layers! Doing the wings in relief was aa fabulous idea! Love it!
This is great Seth. I love seeing the step out process for your background.Thanks!
this turned out wonderful Seth. very cool that you cut out the stamps. I enjoyed seeing all the steps you took to create this. Thank you for sharing.
What a great piece - I am loving these stamps and how simple and versatile they are. Like the perfect LBD, you can dress them up or down.
Question: When you create your backgrounds, do you let each layer dry first or do you keep painting while it's wet?
i just love you seth, you always come thru with something way awesome. i like that you showed the whole process. you are one super duper cool artist. xoxo i am the donation coordinator for charity wings so you know how much i love, love the wings and you sure did justice to them. xoxo
oh wow seth, you never fail to amaze me with your art. you did a super great piece and so glad you showed us how to try and reproduce it. maybe if i had a baby fingers worth of your talent i could. i am the donation coordinator for charity wings so you know i loved that you used the wings. xoxox
I love the step-by-step process that you provided. It makes me feel like I am back on Whidbey Island with you. Nice memory that lives on......
Thanks Seth, I loved the mini tutorial.... It is nice to see different artist's use the same products. It's even better when the products are awesome, like Pam's.
Love your layering and use of wings. Looks like your art and not Pam's
Nice, Seth! Great to see your process too.
I felt like a fly on the wall watching your process! Thanks for sharing, it looks awesome. I agree that wings have been a bit overused but these are so special, I love what you did with them. Very cool as usual.
It is wonderful to see the beginning and the steps to the end piece come together... and the wings give it such meaning.
Okay Seth, I'm off work today and you've definately talked me into putting my to do list aside and putting layers of color on paper instead. Especially like how you cut out the wings.
It's amazing to see how 2 people can use very the same or very similar product and turn out something drastically different. Love how you used all of Pam Carrikers' stamps, especially those wings, Gorgeous!
Great job Seth - you put a lot of work into that-bet you had fun!
Those wings really ARE different. Very nicely done.
Holy Moly!! I didn't know about Pam's stamps, but YOU gave them great honor in the way you used them!
Love it.
Seth, love how you post each step of your process. Your use of the wings by cutting them really gave your piece a nice dimensional look- Great!
Pretty Nifty
beautiful Seth!
seth you are such a favorite of mine and you know i love wings, volunteering for charity wings, we are all about wings. love your art hun. xox
Love these stencils....would love to add any one of the three to my collection.
I love the scratchy background you created for the stamps. Wondering how you did that.
mahalo for sharing your layering technique for both the background piece and the wings
As usual your art awakens me! I also LOVE Pam's wing stamps - they are special!
Miss Molly - Australia
I have used a similar process with the corrugated cardboard as a stencil but didn't KEEP IT!
Thanks for the inspiration Seth :)
I love the use of the corrugated cardboard.
I have used a similar process to print from :)
I always enjoy seeing what you have done. Your colors and composition inspire me.
i loved viewing the progress of the stamp background.
Seth, i loved this piece of art. Pam's stamps are great, but i also appreciated seeing how you achieved the wonderful background effect. thanks.
Beautiful, love the depth of color and texture in the background. The final result is so extrodinary.
Awesome. Loved seeing how you got to the final art work & really love these stamps. The wings rock, so do the dots & the lines for texture effects. Just have to have this set.
Wonderful art work! It is a great inspiration. Thank you for sharing!
Greetings from
Erika
Post a Comment