
I started by selecting a sheet of hand painted watercolor paper from my stash. The surface had been created with pan pastels and spray ink. I glued it onto a piece of book board for support. I ran a gold leafing pen around the edges of the book board and dye ink around the edge of the watercolor paper to better frame out the piece.

I am a sucker for anything printed with numbers or letters and Spellbinders has both in a new embossing folder. This was the inspiration for the project and I used the number side to deeply emboss several pieces of black card stock.

Using a gold Delicata pigment ink pad (which is just about one of the best pads I have found) and a craft sponge, I swiped across the raised letters and highlighted them in rich gold.

I then went ahead and die cut multiple-sized circles out of the sheets of embossed letters, kraft-color card stock, and red decorative paper.

I matched these up with rubber and metal washers that I had gotten from the hardware store.

Stacking and gluing all the pieces together, I came up with the following configurations.

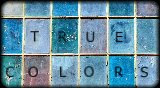
I raided my stash of letter stickers and came across black, capital letters that I thought were perfect for this project.

Finally, I played around with the composition of all the components and when I was happy, I adhered them all to my background piece. As a final touch, I scribbled around the letters with the wax pastels to add more dimension to the piece.


---------------------------------
Supply List
Spellbinders Paper Art Supplies:
GC-001 SpellbindersTM Grand Calibur® Machine
S4-116 SpellbindersTM Nestabilities® Standard Circles Small
Preferred Promotional Partners: Tsukineko Delicata pigment ink pad, Imagine Crafts Inkblushers sponge
Cross Promotional Partners: 7 Gypsies Postale alphabet stickers
Other: book board, watercolor paper, card stock, decorative paper, pan pastels, spray ink, dye ink, leafing pen, wax pastels, hardware, adhesive, paper towel


11 comments:
VERY cool! that is also one of my FAVORITE M-Bossabilities!
This is a great project!!! Love the colors!!
This is fun!
I'm writing down the circle sizes! Very cool!
I love this steampunk-ish, masculine project. You are a master of all styles. Thank you for sharing your work.
great! And I am looking forward to October to get your new book Seth! Congrats on this!
love this! thanks so much for explaining all the steps. See you soon!
Like putting a puzzle together that you made. Great!
I love this Seth! I'm crazzzzzy about numbers.
Beautiful!
thanks for the awesome tutorial...very masculine and something for the mancave...!!
connie paxman
OMG!! This is so COOL!!!
I love what you did with the embossed sheet.
I still haven't used washers in my work. Can you believe that?
Post a Comment