
Welcome to the fourth edition of The Pulse -- The State of the Art -- a survey in words and pictures of the online artist community. The Pulse is a collaborative project that aims to introduce you to new artists, help you get to know familiar faces even more, and allow you access into the creative hearts and minds of a very talented crew of individuals.

Over 150 (!) artists have answered a series of questions which make up The Pulse. Their responses will be presented as a series of online and print projects. And the first continues right now!
Join the The Altered Page every Sunday for "Secret Sunday." Here the secrets of all your favorite artists will be revealed. It could be a technique, a product, a secret source, a little-known website, a hidden shop, an inspiration, just about anything! If you missed any, no worries. You can find links to all the secrets on the sidebar of my blog.
Today's secret.......Techniques Too!
_______________
Vivian Bonder
Blog: Desert Bloom
A while ago I played with glue image transfers and they worked really well. There is a link to my blog post right here.

Roxanne Stout
Blog: River Garden Studio
This is not really a secret... just something I love to do... When I am doing a landscape and I want to put some buildings in it, I like to draw and paint them on watercolor paper first... I tear the bottom off in the shape of the shrubbery or the hillside, and then cut out the structure. Then I glue it on with matt medium and add several layers of mediums and paint right out of the tubes. This building is part of a house in Issigeac, France... a view from my brothers house...

Olivia King
Blog: 4 Rooms and the Moon
I love drawing on brown paper. When I was a kid I could hardly wait for lunch so I could tear open the brown paper bag lunch came in and start drawing. So I suppose it isn’t surprising that one of my favorite purchased journals is a recycled brown paper sketch book by “earthbound” Cachet Products. The covers are brown paper too, and great to work with paint and collage.

This is my secret for building up surfaces, I coat the pages with Liquitex Gesso surface prep. (I find Golden Gesso has a more plastic surface film and I like the “tooth” I get from Liquitex.) The gesso coated brown paper holds up very well to all water media, and can take many layers of paint or collage without wrinkling or warping (be sure and coat both sides or the page will curl). The soft velvety texture the gesso gives the surface is a pleasure to sketch on with graphite. I have recently found you can buy these brown paper journals at Wal-Mart! And about half the price I’ve been paying!
_______________
Linda Germain
Blog: Printmaking without a Press
Blog: Art by Linda Germain
You Tube: Linda Germain
Website: Linda Germain
Well I guess it would be a surprise to see the wonderful textured results that you can get by printing with moldy gelatin. As the gelatin ages it cracks, and gets holey and creates unpredictable textures. You can use newsprint to absorb the excess water and then print with water based inks and a thin strong paper. I have a slidshow video showing examples of prints made with old gelatin here.
Martha Marshall
Blog: An Artist's Journal
Website: Martha Marshall Fine Art
My recently-developed intuitive collage process, whereby I create one huge seemingly-chaotic collage and then use a view finder to create compositions within the matrix of the image. It's been an endless source of fun for me lately.

I wrote about it in my blog here.
_______________
Lisa Wright
Blog: The Wright Stuff
Etsy: The Wright Stuff
I’m still learning – aren’t we all! However, one of the best lessons I’ve taught myself is a little secret I would be willing to share. Painting faces has always been something of a trial. There’s so much to contend with – from getting the shape to the shading right… and let’s not talk about hair. So, I discovered an excellent way to practice which reignites all that childhood pleasure gleaned from colouring in books. Yes, that’s it. You colour in! Just select a striking pose from a magazine, paint over lightly with gesso so you can still just about see the original picture beneath. Then, grab your paints, pastels and crayons and get colouring. It’s more fun to use un-natural shades of blue, green, orange to resculpt the face and hair.

The other method is to transfer the image using gel medium. This is a bit more hit and miss as you never quite know how well the print will stick to your surface but it creates some unexpected surprises too. As long as most of the image comes over you can paint back in the rest. You don’t get so much paper wrinkling with this method and it seems to work best on canvas. I like to paint the canvas a bold colour beforehand so it reflects back through your image.
_______________
Steph Brouwers
Blog: vLaDtHeBaT’s aTTiC
I am crazy about beads and I want to share a technique. If you want to make faux dark amber beads (like Tibetan amber), use translucent polymer clay with a hint of orange and leave it longer in the oven (same t° even a bit lower ).
_______________
Lisa Sarsfield
Blog: Lucky Dip
Now and then I find myself stumped with a collage. I often only have 1 main piece plus 3 or 4 smaller elements but that still equals many possible combinations! Sometimes I also have extra pieces that I'd like to use but I am not sure if they 'belong' there. I usually get stuck when I can least afford to- either when pushing time or when using the last of something I really like! It can be very frustrating and I am sure I am not alone in that!
One technique I've found to really help is to assemble the collage (or altered book spread) in all of it's possible combinations (without actually gluing or stitching it in place) and to then photograph each one individually. That way I can take it apart to try another idea with out actually loosing the first one and I can use the photos as a reference for re-assembling the collage once I have decided which one I like the most. I'm sure most of us have tried a layout and then decided the 'other one' was better but can't quite replicate it the exact way it had been done earlier!
There's two more advantages I feel you get when you photograph your work like this. One being the ability to flick through the images as often as you like and in your own time (with a coffee, on a walk, when waiting in the car...). The second being the ability to compare them directly. Sometimes you just know when you've got a winner and other times it takes a little more searching and it helps to have something to compare your designs with.

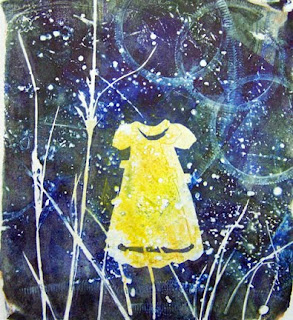
One collage I needed to employ this technique for is this one I made for the International Collage Exchange and the process can be found in this blog post. The photographing process really helped with the decision making and the final piece above was my end choice, and one I am very happy with! At the end of the day being happy in your creating and with your art is what matters the most!
_______________
Mary Layman
Blog: Joyful Ploys
I discovered this quite by accident---I was using acrylic paints plus Caran d'ache crayons in a floral composition. I used black India ink to accent some of the lines in the piece and decided they were too bold so I then used Caran d'ache crayons to go over the lines to soften the ink. Here is one of my pieces using this technique:

Theresa Martin
Website: theresa mARTin
Blog: theresa mARTin
Etsy: Eve Crowe Studios
Cafe Press: Theresa Martin
Here's a Photoshop tip:
If you want to turn an image into a sepia tone, or any monochromatic color here's a good way to do it while preserving the color of your original image. With your image open in PS select Layer, New Fill Layer, Solid Color. Select the color you want. You can change your choice later. After, go to the layers menu and select the Solid Color Layer and choose Color from the blending mode menu. It provides a nice color overlay giving your piece any monochromatic color you wish. You can select the color in the layers menu and change it to any other color or level of transparency. This way you have preserved the color of the original image and given yourself many options for a color overlay.
Before:

After:


23 comments:
Gee, it's been 6 nights now that I've gone without sleep-waiting for your next posting of Secret Sunday. Once again, definitely worth waiting for! Love reading about all of the techniques of the artists! They're so creative-I'm going to try a few tomorrow-which I guess is now today!
Can't imagine all of the time and effort that goes into creating these wonderful posts Seth. Tremdendous thanks- you've scored another home run!
thanks, seth! i really love these tips!
Another fascinating, fun collection of artists and their great work. Thanks, and Happy New year Seth!
I'll be spending the rest of the day checking out these wonderful secrets and techniques, then trying a few of them for use in my art. This Sunday series has turned into something I, as well as many other bloggers, look forward to each week. Thanks again for arranging, organizing, and posting these posts each week.
Happy NEW YEAR.
I've been thinking the same thing Jill said - can't imagine all the time and effort you put into these posts! Thank you very much.
thank you so much for collecting, organizing and sharing all of this great info!i love seeing the art & getting my imagination fired up.
Great post!
Needs to go to a publisher so that I can sit and leisurely look through everything. Great job Seth.
A happy and healthy New Year to you.
A wealth of great things to try this upcoming week off...
thanks Seth!
There goes my Sunday...err Monday, LOL! Lots of fun things here to try out! Thanks for another fun post bulging with creative ideas and techniques Seth!
Wonderful inspiring stuff, Seth! Kudos to you and to all the participating artists.
excellent group of ideas Seth!
Shona
thanks Seth, I have lots of new techniques to try. I appreciate all the work that you are putting into these sunday secrets. I am telling all my art buddies to check it out.
The best part about this Sunday's secrets is discovering some fantastic new art blogs "out there". Your "secret" gift-ings just keep on giving long after the posts are gone.
Seth, I just love this Secret Sunday thing! Best thing out since Saturday.
wow! what a treasure trove of information! thanks so mucy for gathering and sharing all this. so glad I found you.
wonderful - thanks seth!
dear seth, I love reading all these "secrets." Thanks so much for including me in this amazing project. roxanne
WOW, what a lot of wonderful information and sharing ... again!
Thanks to all!
These posts are a course in themselves! I think it would take a year to try all these things. I'm so glad so many people were willing to share!
Back for another browse through Sunday Secrets ..... One sleep and a half til next Sunday!
I just love secret Sunday..Even though I am just now reading it..Always behind..LOL...Seth you are the best.
Love this series, Seth! What a great idea! I learned a lot! Can't wait for the next set of Secrets :)
Post a Comment