Monday, December 30, 2013

Bits and Pieces

The new issue of Pasticcio Quartz is now available. Sarah Fishburn and Angela Cartwright are the brains behind this QUality ART Zine.


This is one of my favorite publications out there. Every issue of Pasticcio Quartz delivers so much and the 60-page, issue #15 is no exception.  In addition to pages and pages of art, there are also interviews, book reviews, movie quips, tutorials, links to discover, stories, historical artist reviews, and so much more.

I so appreciate the wonderful review that Sarah and Angela wrote about my book The Mixed-Media Artist and the fact that they included a piece of my art entitled Seek the Stars.


You can see a preview of Pasticcio and order all 15 issues here.

---------------------------

Australia here I come. Registration is now open for Art is You Australian Mixed Media Road Show


I will be joining four other US artists (Kecia Deveney, Andrea Matus DeMeng, Michael DeMeng and Sue Pellitier, as well as a group of local Aussie artists, in August 2014 in three different locations down under: New South Wales, Victoria and Queensland. This all inclusive retreat will include workshops and many special events. I am gobsmacked to be part of this adventure and hope to see some of you there!

---------------------------

Hot off the presses from the people at Cloth Paper Scissors is a new downloadable eMag called Art Lessons: 2013 Collage & Paint Series Collector's Edition


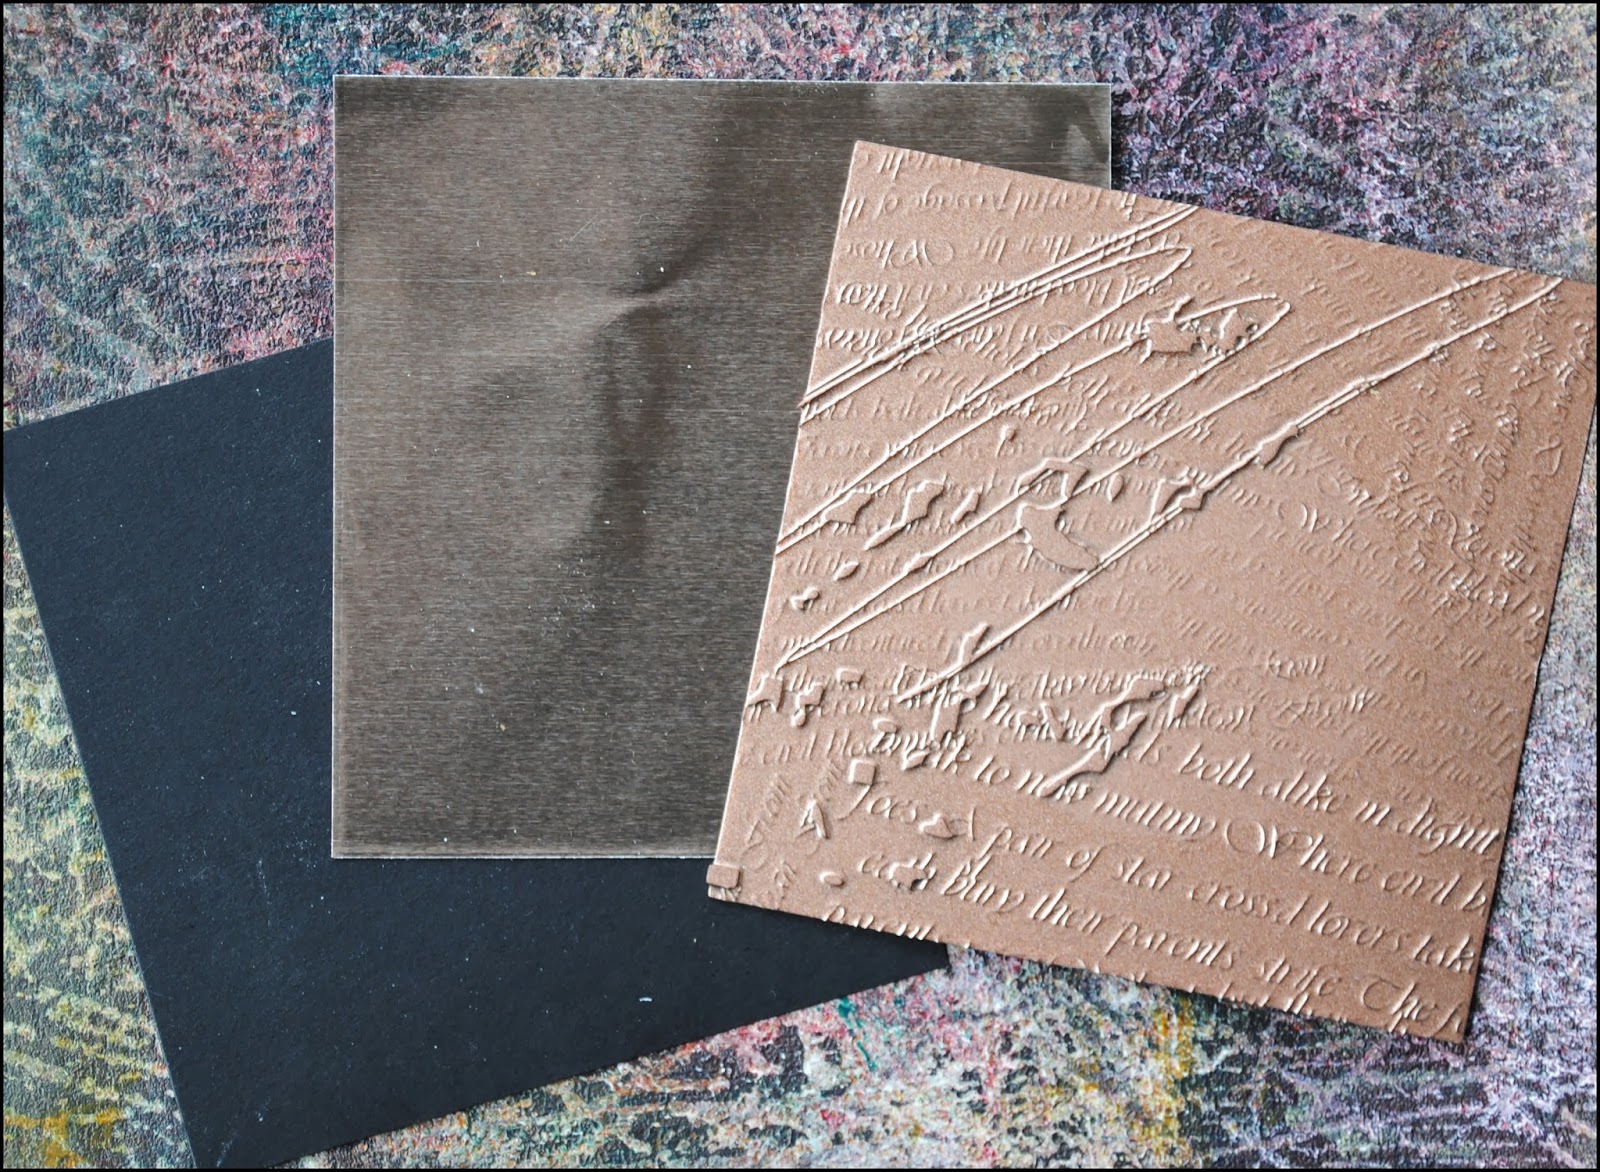
This publication is a compilation of 14 Art Lessons (one from each month of 2013 and 2 new bonus lessons) from artists such as Julie Fei-Fan Balzer, Downa Downey, Jane Davenport, Carolyn Dube, Karen Michel, and many others. I am so happy to be part of this group and my Dimensional Stenciling Art Lesson is included as well.

---------------------------

Congratulations to artist Lesley Riley. Her recently released, self published book Quotes Illustrated has been picked up by North Light Books and will be reissued with additional content. 


If you want a copy of the original book, you only have until midnight 1/1/14 to order. If you want to be part of the new edition, there is still time to submit artwork -- all of which is inspired by quotes. For details on the artist call, click here.

---------------------------

I have been planning a "project" for quite some time and have been busy behind the scenes working on making it happen. Thrilled that it is now complete and will be revealed just after the new year. My first resolution checked off. See you for the reveal.

Monday, December 23, 2013

Dream


This time of year is always one of reflection for me - thinking about the year that has passed and looking forward to the one about to unfold. It is a time to take stock, make plans and set goals. And above all, it is time to dream...

Wednesday, December 18, 2013

5 Tips to Integrate Your Collage

Sometimes collage just looks like smaller paper (or other material) glued to a larger surface. But there are many ways in which to alter your collage elements to make the piece a more cohesive and seamless whole.


Five tips to integrate collage elements...

Splatter: Mix acrylic paint with a small amount of water and add random splatters by either flicking a paint brush or rubbing the bristles of a tooth brush. Hint: remove some of the excess paint on your brush by first splattering onto a random surface. This way you will end up with subtle splatter and not big blotches on your artwork.


Dry Brush: Apply a small amount of white gesso onto your brush and randomly dry brush over the elements on your collage. Be "purposely random" so that you do not end up with gesso lines. Hint: mix the gesso with your choice of color of acrylic paint if you would prefer to add an extra layer of color rather than white.


Connection: Connect all the disparate pieces of the collage with either hand drawn marks (lines, dots, dashes, etc) or very thin strips of paper. Hint: use very light marks and/or colors that match the background so that the connections are more subtle.


Edging: Chose collage fragments that have jagged, curved or torn edges rather than linear edges. Hint: if you do end up with many hard edges in your "finished" collage, soften the look by adding small pieces of torn paper, shreds of fabric, stitching, or random marks to the edges of the collage fragments.


Color: Create a glaze by mixing fluid acrylic paint and acrylic glazing liquid. Brush over the entire surface of the collage. Hint: quickly wipe off random sections of the glazing layer with a paper towel or rag to add more visual interest to the collage.

Monday, December 16, 2013

Design-abilities


Welcome to the Spellbinders Design-abilities Blog Hop. The Blog Team at Spellbinders has decided to hold this online event on the 16th of every other month. This is our way of doing something fresh, fun, and creative to bring our team together. The Hop is not officially sponsored by Spellbinders, just something that we were all inspired to do. We all have different creative strengths and the posts you will see may focus on mixed media, die cutting, paper arts, DIY projects, jewelry, or home decor. There is no theme -- we all get to do whatever we choose.

For today's project, I was inspired by the holiday season. I thought it would be nice idea to add a handmade touch to cards and presents for the holidays by making mini artworks to include. I decided to raid my stash of die cuts -- you know, the pile that we all have of pieces that we cut but did not use.


I challenged myself to create only with these as the primary embellishment. I also gathered up bits and pieces from my stash of hand painted papers to use as the base. I got to collaging, cutting and pasting, and putting all the pieces together.

Here are a few of my favorites...


For reference, the following are a list of the Spellbinders products I used.

GC-001 SpellbindersTM Grand Calibur® Machine
S4-201 SpellbindersTM Nestabilities® Deckled Rectangles Small
S4-114 SpellbindersTM Nestabilities® Standard Circles Large
S4-116 SpellbindersTM Nestabilities® Standard Circles Small
S4-408 SpellbindersTM Nestabilities® Rounded Squares
S5-172 SpellbindersTM Nestabilities® A2 Curved Matting Basics B
S4-396 SpellbindersTM Shapeabilities® You Are Here
MD1-004 - SpellbindersTM Media Mixage® Triangles One Dies
MT1-009 SpellbindersTM Keys Texture Plate
F-012 SpellbindersTM  Precious Metals Premium Craft Foils Assortment

-----------------------------

Head on over to the blogs of the other Blog Team members. Not every person will participate in every Blog Hop but you can check out their blogs anyhow. You are sure to find inspiration along the way!

Becca Feeken
Darsie Bruno
Debbie Olson
Heidi Blankenship
Linda Duke
Michelle Woerner
Seth Apter (you are here)
Sherry Cheever

Friday, December 13, 2013

Get in Gear


Among my most favorite die sets from Spellbinders are Cogs and Sprightly Sprockets. I have used the dies in these sets in many of my art pieces, often matched up with Standard Circles Small and Large


As with most of the products from Spellbinders, I integrate them as one of many supplies I use in my mixed media art. I often use metal and/or foil with these dies and they pair up perfectly with my stash of hardware that I get from one of my favorite places to visit: the hardware store. 

These particular dies have become a big part of my Gears series.

My first piece in this series was actually the first artwork I made as part of the Spellbinders Blog Team.


I am happy to share that the second piece in this series was just published in the Winter 2014 issue of Scrapbooking & Beyond.


My most recent piece in this series was a large triptych. I was lucky enough to receive the following picture from the person who purchased the work. It is rare that I get a chance to see my art hanging in its home so I was extra pleased to see this.


And now after putting this post together, I am gearing up to make the next piece in the series! Until then, you can see all my Spellbinders' tutorials at this link.

Wednesday, December 11, 2013

Busting Out

I will be busting out at the Craftacular in NYC this Saturday 12/14 and Sunday 12/15. Stop by if you have a chance.


Monday, December 9, 2013

2014 Workshops Announced


I have updated my Workshop Page and listed my scheduled workshops for 2014. This list will be updated as individual venue registration opens and as additional classes are added. You can see the schedule at anytime by clicking on the [WORKSHOPS] link just under my blog banner.

Details can be found on the Workshop Page but my 2014 highlights are listed below:

January: I will be attending and teaching at the Craft & Hobby Association annual trade show in Anaheim, California. I have created two new workshops especially for this venue, one of which is filled. Attendance is for CHA members only. 

February: February takes me back to California just in time to avoid the worst of winter in NYC. Registration has just opened for my workshop at San Diego Book Arts but seats are limited. I then head to the Los Angeles area, where I will be teaching 2 two-day, collaborative workshops with Orly Avineri and an evening workshop at Guilding the Lily in Fullerton. All these workshops are filled. I then fly to Mexico where I will be teaching a book making workshop at the home and studio of my good friend and artist Patricia Larsen. That workshop is also filled.

March: March keeps me close to home in NYC, where I will be debuting a new workshop at The Ink Pad.

April: I hit the road again in April, when I will be teaching two workshops at Absolutely Everything in Topsfield, Massachusetts and two workshops at Random Arts in Saluda, North Carolina.

May: In May I head back to The Queen's Ink in Savage, Maryland, where I will be teaching three workshops - two of which will be completely new.

June: In June I head to the eclectic Paperie in Exeter, New Hampshire for two workshops and to Charmed I'm Sure Studio in Mechanicsburg, Pennsylvania, where I will be teaching three.

July: I am headed back to Beautiful Impressions in Westbrook Connecticut, where I will be teaching two workshops. Note that this was originally scheduled for November and now has been moved to July.  

August: In August, one of my dreams comes true when I set out on an adventure of a lifetime teaching in Australia as part of the Art is You Down Under Mixed Media Roadshow. I have already started the countdown on this one!

September: I have no workshops scheduled in September - yet!

October: I will be back at Art is You Stamford in Connecticut where I will be teaching just one workshop this year.

November: I have no workshops scheduled in November - yet!

December: I have no workshops scheduled in December - yet!

Friday, December 6, 2013

It's Still True...


I couldn't let 2013 pass without acknowledging the ten year anniversary of the publication of True Colors, an art book that had an impact on me like no other. Despite the passage of time and a flood of art books since then, True Colors continues to be my all-time favorite. For me, it started it all!

True Colors: A Palette of Collaborative Art Journals

Back in 2010, I connected with the True Color's crew and honored their creativity with a blog project where nearly all of the original contributors shared their thoughts about the TC experience. To celebrate ten years, I have decided to again post their stories and perhaps introduce a few new people to an amazing book. If you are not familiar with this book, trust me when I say take notice. Below you will find an excerpt from my original post and links to the contributors' reminiscences.

---------------------------------

"Although I cannot seem to remember the year that I bought True Colors (I am guessing it was in 2004), I do remember the tremendous impact it had on me. In an instant my artistic identity was somehow changed. This book seemed to unlock something inside me and offered in its pages, a world of possibilities that I was eager to explore.

I have often wondered why this book seems to have effected me like no other. 288 pages (!) of mixed media brilliance and creative expression. Tremendously beautiful photography and layouts. A publication date when this type of project was pioneering and completely unique. A quality of creative detail that I had not yet to experience in terms of handmade journals. And a sense through the text that this group of 15 artists shared a creative bond and respect that was quite special. This is one amazing group of artists. And if you have been impacted in any way by True Colors, you can just imagine how it impacted them!"

Their own stories...

Wednesday, December 4, 2013

A Spellbinding Year


Nearly one year ago I embarked on an adventure that I first wrote about here: I became a member of the Spellbinders family as a blogger. I consider myself a mixed media artist and Spellbinders has traditionally been connected with the scrapbooking and card making communities. However, at the time I joined, they were crossing into mixed media with the release of a new product line called Media Mixage. And, more importantly, they were also about to unveil a new slogan that thoroughly resonated with me: Explore Beyond.


As a blogger for Spellbinders, my hope was that I could introduce a host of new tools and techniques to my mixed media crew and that my mixed media style might rub off on the scrapbookers and card makers as well. This idea of crossing boundaries and blending creative approaches is my way of addressing the exclusivity and snobbery I have sometimes encountered within the art world. I sincerely believe that creativity belongs to everybody and that we all have talents to share.


As I look back upon my experience of the past year, I am extremely gratified to have been connected with such an innovative company filled with talented, dedicated and inspiring people. I now count die cuts, texture plates, embossing folders, and bezels among my mixed media arsenal. I have grown as an artist and creative individual as a result. I have been introduced to an entirely new world within the craft community and am now a designer member of the CHA (Craft and Hobby Association). And the feedback I have received from others suggests that more and more people are in fact exploring beyond.


Part of my role with Spellbinders has been to post step-by-step tutorials of the artwork I create that includes their products. As my one year anniversary approaches, I have created a blog page that includes images of many of the pieces I have created and links to their original tutorials. That reference can be found here and will always be available by clicking on the "Spellbinders" link just below my blog header.


As I continue my adventure as part of the Spellbinders team, I am excited about what 2014 has in store for me. I have big plans that never would have existed had it not been for Stacey Caron and the whole Spellbinders crew. Thanks to you all. A spellbinding year indeed!


Monday, December 2, 2013

7 Ways to Stop an Artist Block

Very often when struck by a loss of inspiration, artists will begin to over think and over analyze. The following strategies may help you to reconnect to the more creative side of your brain.


Seven quick exercises to...
break through an artist block,
silence the inner critic,
tap into your right brain,
find inspiration.

Randomly select a photograph on your smart phone or hard drive and choose one aspect (could be color, composition, subject, emotion, etc). Use that to create a quick sketch of a potential work.

Without censoring yourself, free associate a series of words that either pop into your head or that describe your mood in that moment. Then use those words as inspiration to make something.

Choose one supply from your undoubtedly large stash of supplies that you have not opened yet and use it as the main jumping off point for a new piece.

If you collect found objects and bits & pieces (and who doesn't?), randomly choose one. Then look for a second object that "goes with" the first. Keep repeating the process until you have a bolt of inspiration and/or a direction for your work.

Use your non-dominant hand to roughly sketch a loose series of lines. Afterwords, look at the sketch to see if you are inspired by a figure that appears, by the curve of a line, etc.

Do a Google image search for one or more artists that you admire. With the grid of their work on the screen, come up with a few words that describe what it is that you like about their work (organic, dark, textural, etc) and then use those words to create your own artwork in your own style.

Look at your own artwork, pictures in magazine, random bits of paper -- but look at them upside down in order to open your eyes and mind to a different way of thinking.

Friday, November 29, 2013

Quite Still...

be quite still and solitary...

I am excited to share that artist and coach Lesley Riley has just released a new book called Quotes Illustrated: 100 Works of Art Inspired by Words.


More than 90 artists were inspired to create a new artwork based on a quote provided by Lesley. The pairing of words and art are lovingly presented on the pages of this book. The contributors are a mix of familiar faces and artists to discover. 

I am happy to say that I am a contributing artist to this book along with many of my friends including Chris Cozen, Lynne Hoppe, Ingrid Dijkers, Marcia Beckett, Darlene Campbell, Patti Edmon, Gina Rossi Armfield, Serena Barton, Patti Monroe-Mohrenweiser, Jill K. Berry, Pam Carriker, Holly Dean, Stacey Merrill, Deborah Guthrie, Theresa Martin, Pat Patingolo, Theresa Wells Stifel, and too many more to name.

My Quote...

Be quite still and solitary. The world will freely offer itself to you unmasked. It has no choice. It will roll in ecstasy at your feet. Franz Kafka

...inspired my art


---------------------------------

Quotes Illustrated can be purchased from Amazon or directly from CreateSpace where, if you use the code 85AXKF9S before 12/7, you will receive 20% off.

Wednesday, November 27, 2013

Photo Pockets

I am always looking to take my photos off my iPhone, where they are never seen, and find a unique way to display them so that they can be on display. Today's solution: photo pockets...

I started with sheets of bronze craft foil and black card stock, which I cut to size to match Spellbinders Poetry Texture Plate.

Using the largest of the dies from Spellbinders Media Mixage Circles, I cut out a circle from the center of the foil piece to create a window within a frame. I love the contrast of the circular curves with the squared edges of the foil.


I embossed the foil by running it through the Artisan X-Xplorer with the Texture Plate. I ran a sanding block across the surface which uncovers the silver from the reverse side of the bronze foil. This will be the front of my frame.


I love the deep embossing I get with this technique.


I used the black card stock I had cut earlier to back the frame. Putting a narrow strip of adhesive on three sides, I adhered the card stock to the back of the frame making sure to leave the side without adhesive at the top. This will create the pocket and allow me to slip a photo in and out.


Feeling like the frame looked a bit unfinished, I cut a ring out of red card stock by stacking the same Spellbinders die I had used earlier along with a larger die from Spellbinders Standard Circles Large set.


I adhered the ring to the outer rim of the circular window in the frame.


All that I had left to do was insert my photograph, which in this case was a detail from one of my collages.


I love the fact that I can change the photograph at any time.


This project is so easy and so fun, I couldn't resist creating one more using different colors and a different texture plate!


Given the time of year, it strikes me that this would make a nice, personalized gift tag. And although I am not a card maker, I think this would be the perfect embellishment on the front of a handmade card.

-------------------------------------

Supply List

Spellbinders Paper Art Supplies:

MMM--001 SpellbindersTM Grand Caibur® Machine
MT1-001 SpellbindersTM Media Mixage® Texture Plates Poetry
MT1-004 SpellbindersTM Media Mixage® Texture Plates Crackle
F-012 SpellbindersTM  Precious Metals Premium Craft Foils Assortment 
MD1-012 - SpellbindersTM Media Mixage® Rectangles 
S4-114 SpellbindersTM Nestabilities® Standard Circles Large

Other: card stock, scissors, sanding block, adhesive, photographs