
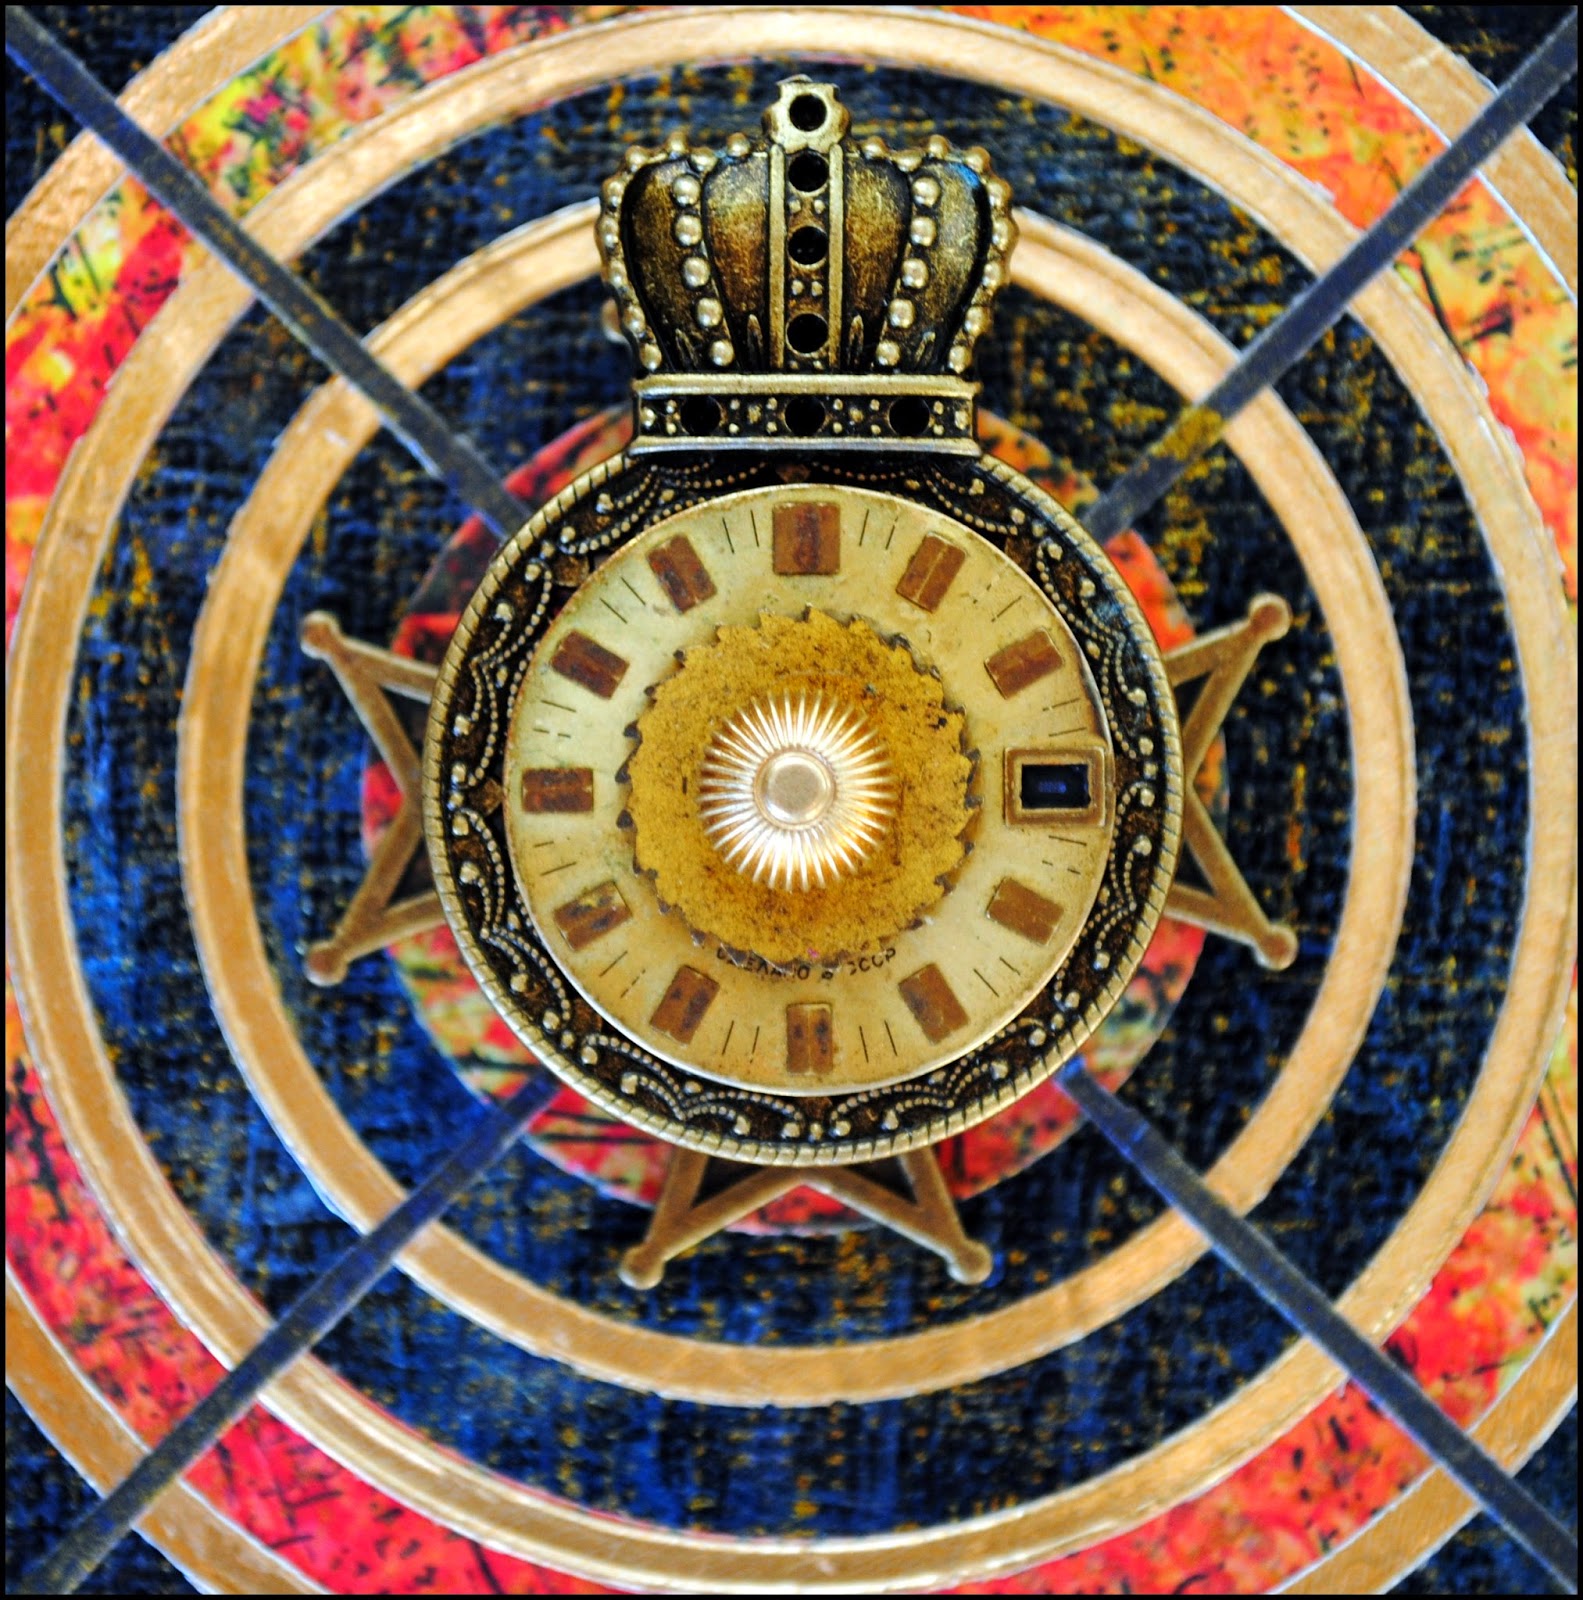
Watch Over
I admit that I have become a bit obsessed with making Medallions using the A Gilded Life collection from Spellbinders. So far I have primarily used the pendants and bezels from the line but waiting in the wings are the texture plates, relics, and dies that are also part of the collection. Soon!
Today's artwork started with a 4 x 4 inch cradled wood panel which I painted with gesso and acrylic paint.

The gold highlights on the surface were made using a rubber stamp and another obsession of mine: Golden Glitz Delicata Pigment Ink from Imagine Crafts. This is hands down the best metallic ink pad I have ever used.

Once the background was complete, I sorted through my stash and chose a bezel and a pendant from Spellbinders, both in bronze tones. I clipped the ring off the pendant using tin snips.

While the bezel and pendant would form the core of the medallion, I knew that I needed additional elements to anchor the medallion to the surface and add dimension. Out came my sets of Standard Circle dies (small and large) from Spellbinders. These dies nest within each other, thereby allowing you to create loops.

I created three loops using both metallic foil and decorative paper, which I altered with solvent and pigment ink

Adhering three of these pieces together gave me the following edged loop.

I then used one of the circle dies to cut one more piece of decorative paper, which was again altered with ink.

I admit to a third obsession and that is found and vintage metal objects. I went through my collection and found a watch face and two watch parts to use to create the medallion.

Experience told me that this series of paneled medallions look better with more design elements, so I chose Spellbinders Labels Twenty-Seven die set and cut another piece of metallic foil.

I always want to take commercial supplies and make them my own by adding my own twist. In this case, I cut off four corners from the Labels die cut and knew that they would make perfect additions to the corners of the wood panel.

Finally, to tie the piece together and connect the elements, I cut inked decorative paper into four arrows using the new Shoot! die set from Spellbinders. As you can see by the arrow on the left, I trimmed the feather end off the arrows.

At this point, the fun part really began as I took all these individual elements and put them together on the panel. Once I had cut all the pieces I had a design plan in mind, so I was able to easily adhere all the pieces.


Sold. Thank you!
-------------------------------------
Supply List
Spellbinders Paper Art Supplies:
Preferred Promotional Partners: Imagine Crafts Golden Glitz Delicata Pigment Ink, Imagine Crafts Midnight Blue StazOn Solvent Ink
Cross Promotional Partners: Golden Artists Colors, Inc. Fluid Acrylic Paint
Cross Promotional Partners: Golden Artists Colors, Inc. Fluid Acrylic Paint
Other: cradled wood panel, gesso, paint brush, decorative paper, vintage watch parts, rubber stamp, adhesive, scissor, tin snips


14 comments:
It's great to see the different layers of the artwork.This one looks masculine ...nautical. I'm liking the medallion madness, Seth.
How beautiful, Seth!
I love your being obsessed with the Spellbinders Gilded Life range! The results are always so eclectic and innovative!
Using the circle dies themselves as metal elements for your creation is definitely genious and so cleverly thought. Love this!
I have a collection of found objects and watch parts too....they are all sitting in the drawers of my "inspirational cabinet"...waiting to find their new homes on new creations. ;)
Greetings from Vienna,
Claudia x
Wow, Seth! This is gorgeous! I love the colors and the way you used the corners from the one die cut. I really wasn't into these components until I took your class last week. Now I see all kinds of possibilities!
Enjoyed reading your process! These elements are super intriguing and you have used them in such a cool way :)
I love this one! The Iron Cross bezel is my favorite piece from the collection, so it's great to see how you used it. And the way you put together all those different elements is really fantastic. I've got to play more with this stuff!
What a process!...but the end result is absolutely worth it.
is just amazing!
Love this. I admit I've not used any of the die machines yet. I'm on the fence on which one I'd like to start with and have no idea. This looks like so much fun.
So cool, I love all of the different layers
That is wonderful & the canvas underneath is just gorgeous.
Fanulous piece! Loving your medallion madness. Shame to cover up so much of that cool canvas. ;)
OK, the board looked really great but you lost me with the name: Golden Glitz Delicata???? Please, can't we at least get some Guy names here? Like Zippered Up Slam Fest or SmackDown Wham???
Great colors and textures in this piece. Thanks for the step outs.
Totally fabulous!! Love that you shared the details in the making! Thank you Seth!
ps...where is that(hands down best metallic)ink located? Is it not out yet?
Post a Comment